Download and Install
Selenium IDE:
To
get start navigate to http://seleniumhq.org/download/ link and download the
Selenium IDE and install it. When you installing the Selenium IDE, for
security, Firefox notification will popup. Click on Allow and continue
installation.
Once
the Installation has finished you can start the Selenium IDE by Clicking the
Selenium IDE icon on the Firefox menu or by pressing Ctrl + Alt + S
Features of Selenium IDE:
Menu Bar:
The
Top most portion is Menu Bar. It contains File, Edit, Actions, Options, Help
menus. Menu Bar can be used to create, modify, and export test cases into
different formats that use by Selenium RC and WebDriver.
File
Menu:One of the most importance feature in the file menu is “Export”. Because it allows us to change the Selenium IDE test case file format into different formats which can run on Selenium RC and WebDriver. There are two option to Export
“Export Test Case As…”: Export currently open test case
“Export Test Suite As…”: Export currently open test suite.
“Export” option have multiple options in the following format: file format which need to exported/ unite test framework to be used/ selenium framework to be used on the exported test case
Edit
Menu:Edit Menu have copy, paste, delete, cut undo, Redo, SelectAll,
Insert New Command, Insert New Comment. Newly inserted command and comments
will place top of selected line. Commands are colored black. Comments are
colored purple.
Actions:Under
the Actions you can find many option related to record and play.
Options:It
provides interface for configuring various setting. The Clipboard Format option
allows to select the Selenese command from the editor and paste it as a code
snippet. The default is HTML you can select as your need.
Base URL Bar:
The
Base URL is useful in accessing relative URLs.
Tool Bar:
It contains following in the order:
Playback
Speed controller: This controls the speed of Test Script
Execution.
Play
entire test suite: This sequentially play all the test
cases listed in the Test Plan
Play
current test case: This play only the currently selected test case.
Pause/Resume: This pause or resume
test case.
Step:
This button allows to step into each command in test script. Basically it used
debug the script.
Apply
rollup rules: This is an advanced functionality. It
allows to group Selenese commands together and execute them as a single action.
Record:
This starts/ends your recording session.
Each browser action is entered as a Selenese command in the Editor.
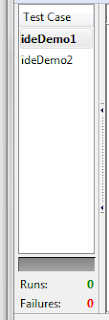
Test Case Pane:
List
the Currently Opened test cases. If you open test suite it list, the all the
test case in test suite. Currently selected one is in bold. If the test case
passed it shows in Green color and if it fails, it show in Red. The bottoms
show the summery of test cases.
Editor:
Show
the recorded commands. It is available in Table and Source views. In the Table
view it shows three elements for each Command, those are
Command:
Describe name of command
Target:
Describe the Target, may be name, id or Xpath
Value:
Shows value for element.
In
Source view it display steps in HTML format.
Log:
Display
runtime message during the execution time.
Reference:
Shows
concise description of the currently selected Selenese command in the Editor.
It also shows the description about the locator and value to be used on that
command.


